Achieving a 20% reduction in OR time with 3D printed models is not an incidental benefit; it is the direct result of a precise, multi-stage pre-surgical engineering workflow.
- Material selection for true bone-like haptic feedback is a critical first step for realistic surgical simulation.
- The integrity of the data pipeline, from CT scan to the final STL file, must be rigorously maintained to preserve critical anatomical details.
- Low-temperature sterilization is non-negotiable to prevent model warping and ensure dimensional accuracy in the operating room.
Recommendation: Adopt a protocol-driven approach, treating the anatomical model not as a simple visual aid, but as a calibrated surgical instrument essential for pre-operative planning.
For maxillofacial and orthopedic surgeons, every minute in the operating room is critical. The pressure to execute complex reconstructions with absolute precision, often under challenging anatomical conditions, is immense. While the concept of using 3D printed models for pre-surgical planning has become more common, it is often presented as a simple visualization tool. Surgeons are told these models « improve outcomes » or « help with visualization, » but these generic statements obscure the true source of their power.
The reality is that the most significant benefits, like a quantifiable reduction in surgical time, are not an automatic byproduct of owning a 3D printer. They are earned through a disciplined and highly technical process that transforms raw patient data into a functional, haptically accurate anatomical analogue. The conversation needs to shift from simply having a model to engineering the *right* model.
But what if the key to unlocking this efficiency wasn’t just in the printing, but in a series of critical, often overlooked decisions made long before the surgeon even sees the model? This article deconstructs the specific engineering protocol required to achieve these results. We will move beyond the surface-level benefits and dissect the technical choices—from material science and data conversion to sterilization and workflow integration—that directly translate into minutes saved and precision gained in the OR.
This guide breaks down the essential technical stages and considerations for integrating high-fidelity 3D printed models into your surgical practice. Explore the detailed steps that ensure your models are not just representational, but truly functional tools for pre-operative planning.
Summary: A Technical Guide to Reducing OR Time with 3D Bio-Models
- Resin vs. Powder Sintering: Which Material Mimics Bone Density Best?
- How to Convert CT Scans into Printable STL Files Without Losing Detail?
- Steam vs. Plasma Sterilization: Which Method Won’t Warp 3D Printed Guides?
- The Support Structure Error That Ruins Complex Cardiac Models
- When to Use CPT Codes for 3D Printed Anatomical Models in Pre-Op Planning?
- How to Automate Organ Segmentation for Surgical Planning in Under 10 Minutes?
- How to Certify Surgeons on Robotic Consoles in Under 3 Months?
- How Cutting-Edge Robotic Surgery Systems Improve Tumor Resection Margins?
Resin vs. Powder Sintering: Which Material Mimics Bone Density Best?
The value of a pre-surgical model is directly tied to its haptic fidelity—its ability to realistically replicate the tactile feedback of human tissue. A surgeon planning an osteotomy needs to feel how a saw will interact with bone, not just see its shape. This is where material science becomes paramount. The choice between resin-based technologies like Stereolithography (SLA) and powder-based methods like Selective Laser Sintering (SLS) is not an aesthetic one; it’s a functional decision that dictates the model’s clinical utility.
SLA resins often produce hard, brittle models with a smooth surface, excellent for representing the dense outer layer of cortical bone. In contrast, SLS powders, such as Nylon PA12, create a porous, slightly flexible structure that is remarkably similar to cancellous bone. This material can be drilled, tapped, and sawn, providing an unparalleled simulation experience for orthopedic procedures. The macro view below highlights the distinct textural differences that influence this tactile feedback.
As the visual comparison suggests, the micro-structure of the material is what defines its surgical relevance. For complex reconstructions involving both hard and soft tissues, multi-material PolyJet technology can even combine rigid and soft components in a single print, creating a comprehensive anatomical analogue. The selection process must be driven by the specific surgical action being rehearsed, as detailed in the following comparison.
| Material Type | Density (g/cm³) | Haptic Feedback | Best Application |
|---|---|---|---|
| SLA Rigid Resin | 1.1-1.3 | Hard, brittle | Cortical bone |
| SLS Nylon PA12 | 0.8-1.2 | Porous, drillable | Cancellous bone |
| PolyJet TissueMatrix | 1.0-1.15 | Soft, cuttable | Mixed tissue |
How to Convert CT Scans into Printable STL Files Without Losing Detail?
A 3D printed model is only as accurate as the data it is built from. The process of converting a series of 2D DICOM images from a CT scan into a 3D-printable STL file is a critical juncture where anatomical detail can be easily lost. This is not a simple « file save as » operation; it’s a meticulous data integrity pipeline that requires both sophisticated software and clinical expertise. The goal is to create a « watertight » mesh that is a true representation of the patient’s anatomy, without artifacts or loss of fidelity.
The primary challenge lies in segmentation—the process of isolating the specific tissues of interest (e.g., bone, tumor, vasculature) from the surrounding data. This involves applying specific Hounsfield unit (HU) thresholds to differentiate tissues based on their radiodensity. For example, a threshold of 226-3071 HU is typically used to isolate bone. However, for complex interfaces, such as a tumor invading bone, automated thresholding is insufficient. This is where AI-assisted segmentation tools and manual refinement by a trained technician become indispensable for preserving critical anatomical landmarks. As demonstrated by the Mayo Clinic’s in-house protocol for head and neck cancer surgeries, a well-defined segmentation process directly improves precision through custom 3D models and cutting guides tailored to each patient’s anatomy.
Your 5-Step CT to STL Conversion Protocol
- Data Export: Export DICOM files from the scanner at a maximum slice thickness of 1mm to ensure optimal resolution for the 3D model.
- Thresholding: Apply Hounsfield unit (HU) thresholding specific to the target tissue (e.g., bone: 226-3071 HU) to create an initial 3D mask.
- Segmentation: Perform AI-assisted segmentation for complex anatomical interfaces, using advanced software tools like Materialise Mimics or 3D Slicer to refine boundaries.
- Mesh Validation: Validate the integrity of the resulting 3D mesh, meticulously checking for and repairing any non-manifold edges, inverted normals, or holes that would cause print failure.
- Smoothing and Finalization: Apply smoothing algorithms judiciously to reduce staircase artifacts from the scan slices, while carefully preserving critical anatomical landmarks and features.
Steam vs. Plasma Sterilization: Which Method Won’t Warp 3D Printed Guides?
An anatomical model or surgical guide is useless if it cannot be brought into the sterile field of the operating room. The final step, terminal sterilization, is where many well-printed models fail. The high temperatures and pressures of a standard steam autoclave (121-134°C) can easily warp or melt the polymers used in 3D printing, destroying the dimensional accuracy that was so carefully achieved. A surgical guide that deviates by even a millimeter is no longer a tool of precision; it’s a source of error.
The solution lies in low-temperature sterilization methods. Hydrogen peroxide plasma sterilization, which operates at a cool 45-55°C, has become the gold standard for 3D printed medical devices. It effectively sterilizes the model without inducing thermal stress. Studies confirm that with this method, plasma sterilization maintains accuracy within <0.5mm dimensional deviation, compared to potential deviations of 1-3mm with steam. Ethylene Oxide (EtO) is another effective low-temperature option, though it requires longer aeration cycles.
The compatibility of the printing material with the sterilization method must be confirmed from the outset. As the Formlabs Research Team notes in the Rapid Prototyping Journal, certain biocompatible resins like their « BioMed White resin can be used for short-term contact with tissues, bone and dentin after proper sterilization, » highlighting the need for a systems-based approach where material and sterilization method are chosen in concert.
| Sterilization Method | Temperature | Material Compatibility | Dimensional Change |
|---|---|---|---|
| Steam Autoclave | 121-134°C | Limited (warping risk) | 1-3mm deviation |
| Hydrogen Peroxide Plasma | 45-55°C | Most biocompatible resins | <0.5mm deviation |
| Ethylene Oxide | 37-55°C | All materials | <0.3mm deviation |
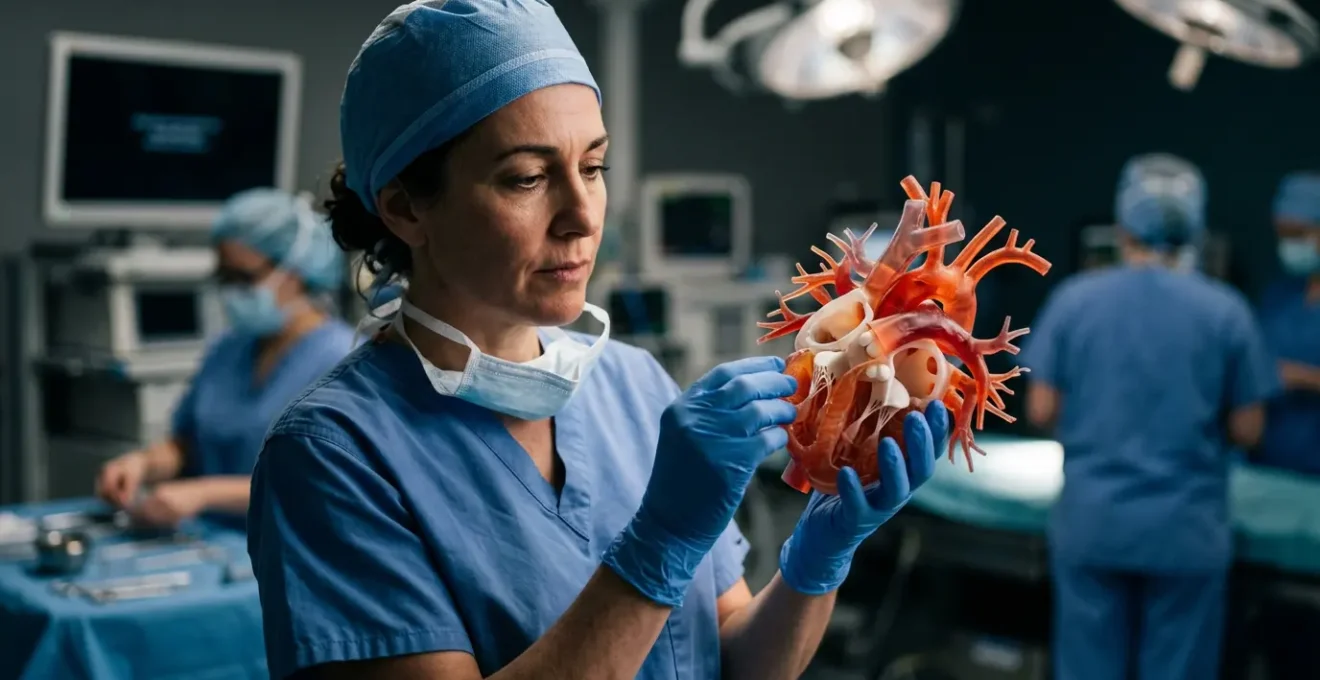
The Support Structure Error That Ruins Complex Cardiac Models
When printing anatomically complex models, particularly those with delicate internal structures like cardiac chambers or vascular networks, the placement of support structures is a high-stakes decision. A single misplaced support can obstruct a critical view of a septal defect or, worse, break off during removal and damage a fragile valve annulus. This isn’t just a failed print; it’s a significant waste of resources. A detailed analysis shows that a failed complex cardiac model costs hospitals approximately $5,500 in advanced materials and machine time.
The most common and devastating error is placing dense support structures on functionally critical surfaces. The goal is to orient the model and design the supports in a way that prioritizes the pristine preservation of these surfaces. For internal cavities, such as the ventricles of a heart, using dissolvable support materials like PVA is often the only way to achieve a clean, accessible internal surface without risking damage from manual removal.
Furthermore, the type of support matters. Dense, grid-like supports are strong but difficult to remove and leave significant scarring. Tree-like supports, which have minimal contact points, are far superior for delicate features like small vessel branches. A thoughtful support strategy involves a trade-off between print stability and post-processing ease, with the clinical application always being the deciding factor. The following guidelines are essential for success:
- Orient the model to minimize supports on clinically significant surfaces like valve annuli and septal defects.
- Use dissolvable PVA supports for intricate internal structures like heart ventricles.
- Set the support-to-model Z-distance to at least 0.2mm for easier, cleaner removal.
- Apply tree supports instead of dense grid supports for delicate vessel branches to prevent breakage.
- Angle the model on the build plate at 30-45° to naturally reduce the overall need for supports.
When to Use CPT Codes for 3D Printed Anatomical Models in Pre-Op Planning?
Integrating 3D printing into a clinical workflow extends beyond the engineering lab; it requires navigating the complex world of medical billing and reimbursement. For years, the creation of anatomical models was often absorbed as a research or departmental cost. However, the establishment of specific Current Procedural Terminology (CPT) codes has created a formal reimbursement workflow, legitimizing these models as a billable component of patient care.
Four Category III CPT codes (0559T, 0560T, 0561T, 0562T) were introduced to cover the generation of individually prepared 3D printed anatomical models. The codes are tiered based on complexity: 0559T for a simple model from one imaging study, and 0560T for a more complex model from multiple studies or segmentations. The add-on codes (+0561T and +0562T) are for creating custom surgical guides from these models. Knowing when and how to apply these codes is crucial for creating a sustainable in-house 3D printing program.
The key is documentation. To justify the use of these codes, the surgeon’s report must clearly state how the 3D model was medically necessary for pre-operative planning and how it directly influenced the surgical approach. A powerful example comes from the VA Health Care System, where a successful implementation showed tangible results. A case study highlights that VA surgeons used 3D-printed models to change a surgical approach from an invasive open procedure to a less invasive endovascular one, directly benefiting the patient with a faster recovery. This demonstrates the powerful synergy between clinical decision-making and financial viability.
How to Automate Organ Segmentation for Surgical Planning in Under 10 Minutes?
Manual segmentation of organs and tumors from CT or MRI scans is a laborious, time-consuming task that can take a skilled radiologist several hours. This bottleneck has historically been a major barrier to the widespread adoption of 3D models for routine surgical planning. However, the advent of AI-powered segmentation algorithms has radically changed this equation, offering a path to dramatically accelerate the process.
Modern medical imaging software now incorporates deep learning models, such as U-Net and V-Net architectures, which are pre-trained on thousands of annotated scans. These tools can perform the bulk of the segmentation work automatically. An important study demonstrated that for many common organs, AI-powered segmentation algorithms achieve 80% completion in under 10 minutes. This transforms the workflow from a manual chore to a process of rapid review and refinement.
However, automation is not a complete replacement for expertise. As Dr. Michael Eames of the UCSF Surgical Planning Study wisely notes, « The 80/20 rule applies perfectly – AI gets you 80% there in minutes, but that final 20% of refinement on tumor margins requires expert radiologist input. » The true power of AI here is in augmentation, not replacement. The workflow becomes a highly efficient partnership:
- Upload DICOM Dataset: Load the patient’s scan into an AI-enabled platform like Materialise Mimics or 3D Slicer.
- Select Pre-trained Model: Choose the appropriate algorithm for the target anatomy (e.g., a liver-specific model).
- Run Automated Segmentation: Execute the algorithm, which typically takes 3-5 minutes.
- Expert Review and Refinement: The surgeon or radiologist then spends a focused 5-7 minutes manually correcting the most critical areas, such as the precise interface between a tumor and major blood vessels.
How to Certify Surgeons on Robotic Consoles in Under 3 Months?
Achieving proficiency on a robotic surgical console like the da Vinci system is a steep learning curve. It requires developing a completely new set of motor skills and spatial awareness. Traditionally, this involved extensive training in simulation labs and, eventually, supervised procedures on patients. High-fidelity, patient-specific 3D printed models offer a powerful intermediate step, creating a safe, repeatable environment to bridge the gap between virtual simulation and the live operating room.
By using a 3D printed anatomical analogue of a complex case, a surgeon in training can practice the exact procedure they will face. They can rehearse difficult dissections, practice novel suturing angles, and test instrument approaches—all without risk to a patient. This hands-on experience with a tactile model accelerates the development of muscle memory and spatial understanding far more effectively than on-screen simulators alone. Integrating these models into training curricula has shown remarkable results, with one study documenting that robotic surgery certification can be accelerated by a 40% reduction in training time.
The process involves mounting the 3D printed organ or anatomical region within a training box that mimics the human torso. The trainee then uses the actual robotic console and instruments to perform the mock surgery. This allows them to experience the haptic feedback of the instruments interacting with the model, anticipate challenges with instrument clashing, and perfect their approach to tumor resection or tissue reconstruction in a low-stress setting. This methodology transforms training from a generalized skill-building exercise into a highly specific, procedure-rehearsal process, leading to faster and more confident certification.
Key Takeaways
- The 20% reduction in OR time is a direct consequence of a rigorous engineering protocol, not an automatic benefit of 3D printing.
- Haptic fidelity is paramount: material choice must be driven by the need to simulate the feel of bone or tissue, making SLS powder often superior for orthopedic applications.
- Data integrity is non-negotiable, requiring a meticulous CT-to-STL pipeline and low-temperature plasma sterilization to preserve dimensional accuracy.
How Cutting-Edge Robotic Surgery Systems Improve Tumor Resection Margins?
The ultimate goal of any pre-surgical planning is to improve the outcome in the operating room. In oncology, one of the most critical metrics of success is achieving clear tumor resection margins. The integration of 3D printed models into the surgical workflow, particularly with robotic systems, directly contributes to this goal by providing an unwavering, three-dimensional physical reference throughout the procedure.
Having a tangible, color-coded model of the tumor and its relationship to vital structures (vasculature, nerves) in the surgeon’s line of sight provides constant spatial orientation. During a long and complex robotic dissection, it’s easy to lose track of the precise 3D location of the tumor boundary. The model acts as an ever-present anatomical map. As Dr. Jon Zabaleta from the Biodonostia Health Research Institute states, « Having the 3D model in my line of sight during robotic surgery serves as a constant physical reference, helping navigate complex anatomy and confirm instrument location relative to tumor margins. »
This enhanced spatial awareness and confidence translate directly into efficiency. With a clearer plan and a physical reference, surgeons hesitate less and make more decisive movements. The Prince of Wales Hospital in Hong Kong, for example, used 3D printed guides to reduce surgical time by one hour while improving precision in complex bone tumor cases. This time-saving is a consistent finding across multiple studies. Indeed, a landmark study confirmed that surgical planning with 3D printing cut operating room time by an average of 41 minutes. By allowing for exhaustive pre-operative rehearsal and providing an intra-operative reference, these models empower surgeons to perform more precise, efficient, and confident resections.
To translate these principles into tangible results, the next logical step is to systematically evaluate and upgrade your institution’s current workflow. Begin by auditing your process, from CT scanner protocols to sterilization methods, to identify and eliminate any weak links that compromise the fidelity of your final anatomical model.